Managing Tunnels
Create, view, edit, and delete WireGuard VPN tunnels using the Vylos home screen and tunnel detail views.
Home Screen Layout
The home screen displays your tunnels in up to two sections:
- Managed Tunnels — Tunnels deployed by your organization through MDM. These are read-only; you cannot edit or delete them.
- My Tunnels — Tunnels you have created or imported. You can edit, delete, and toggle these tunnels freely.
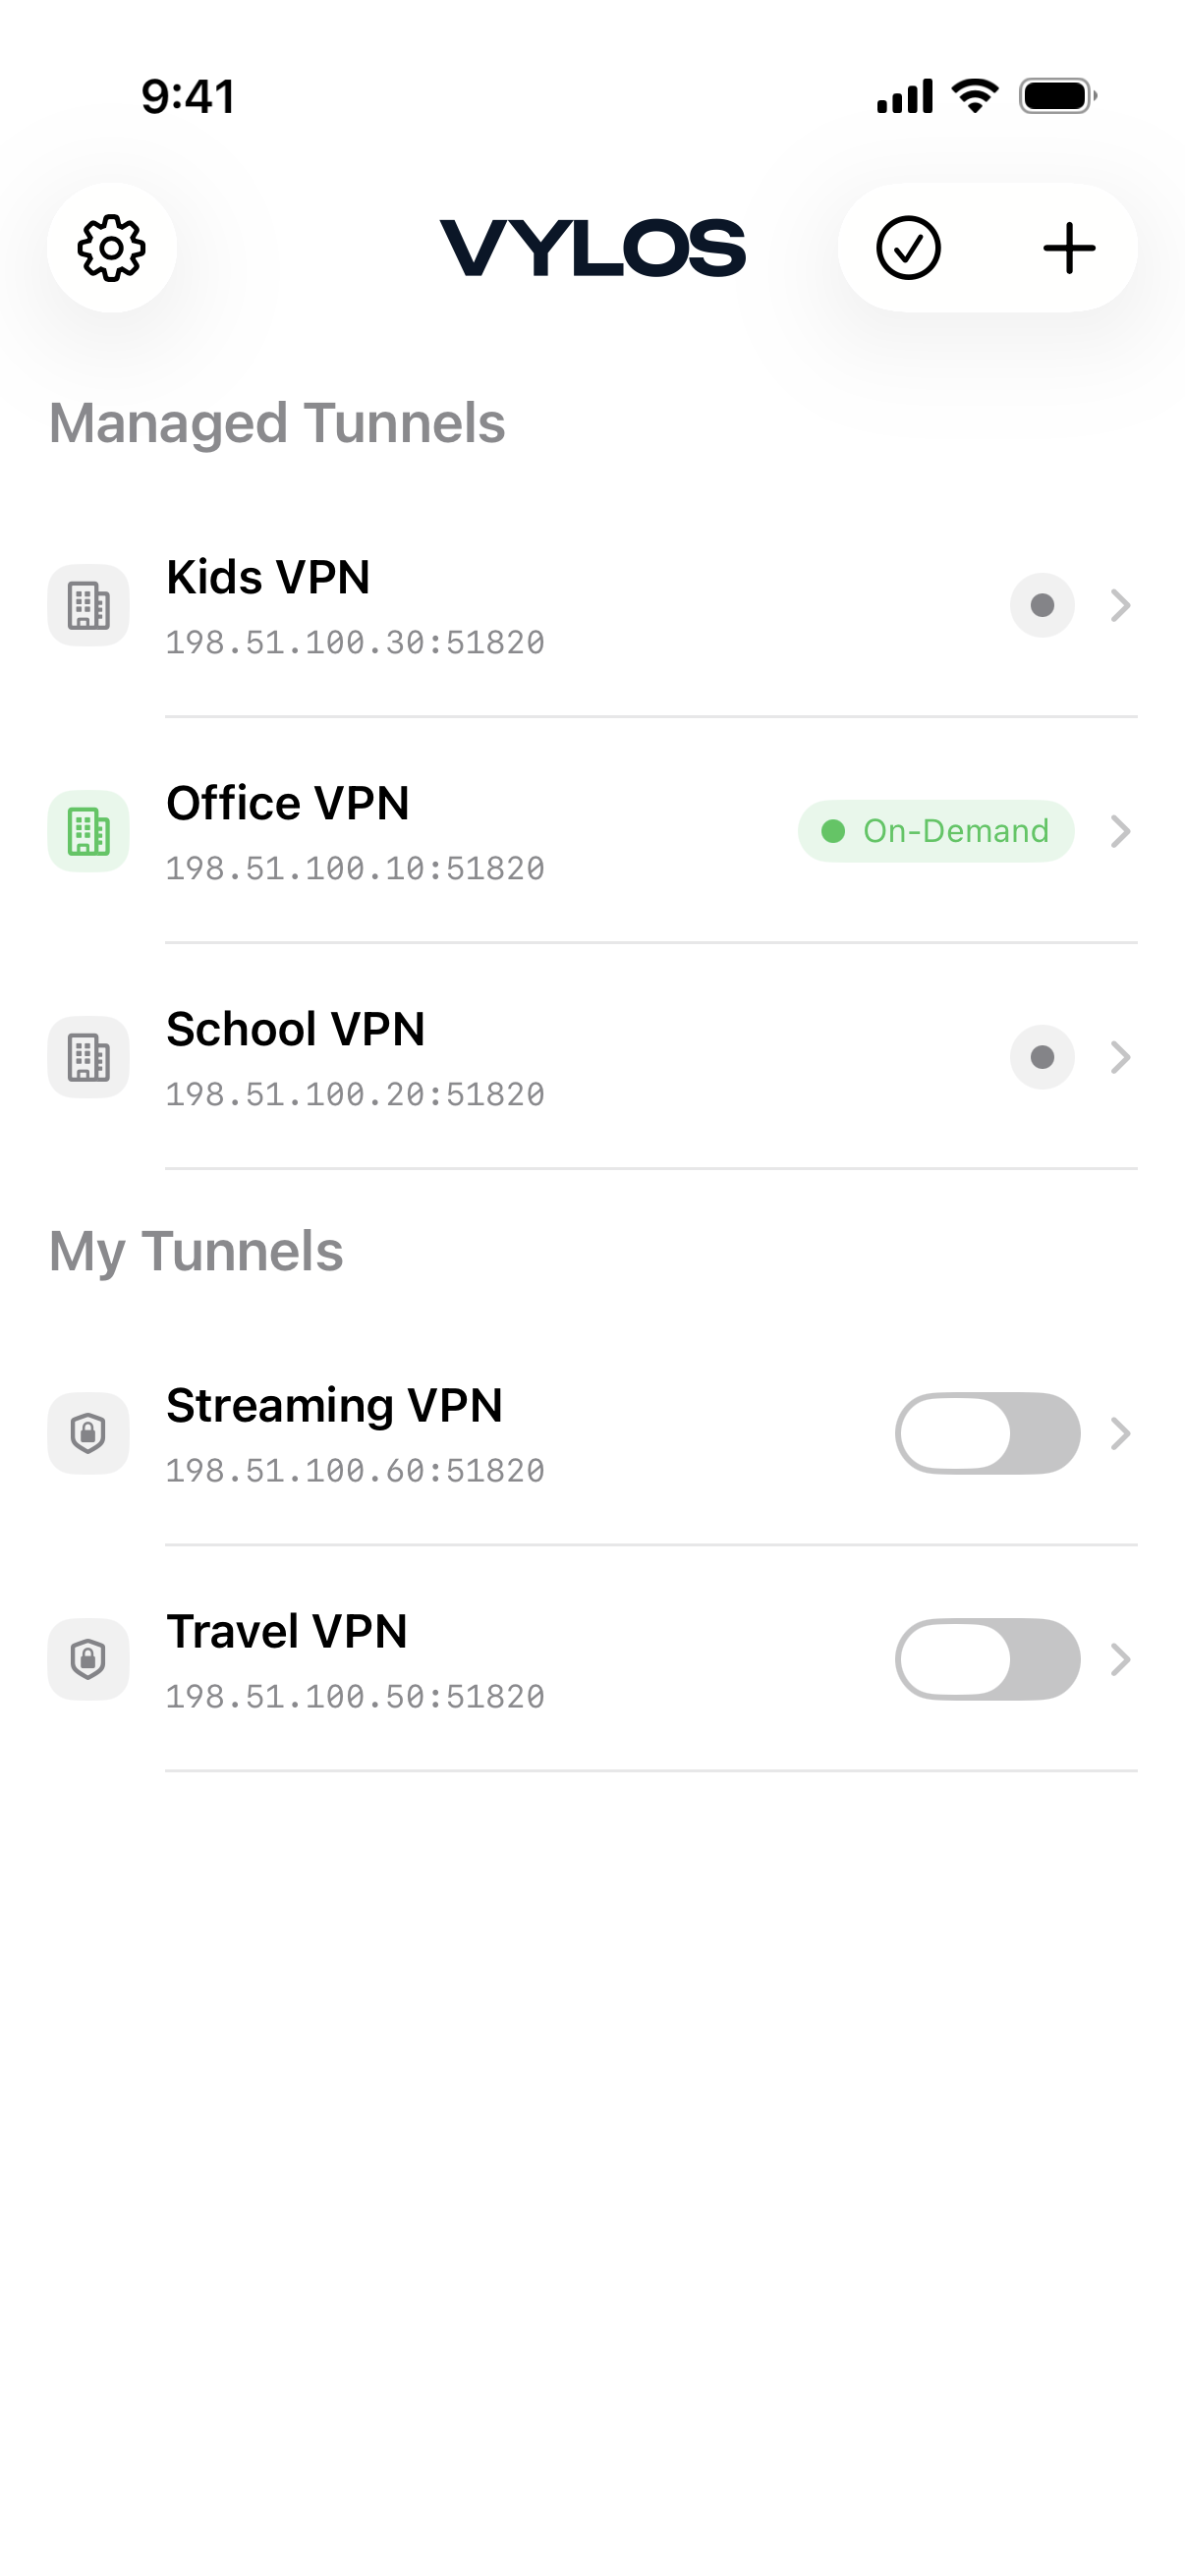
Tunnel Status
Each tunnel displays a status indicator. Standard tunnels (without on-demand rules) show the following statuses:
| Status | Color | Meaning |
|---|---|---|
| Connected | Green | The tunnel is active and carrying traffic. |
| Connecting | Light green | The tunnel is in the process of activating. |
| Disconnecting | Light green | The tunnel is in the process of deactivating. |
| Disconnected | Gray | The tunnel is not active. |
On-Demand Status Labels
Tunnels with on-demand rules enabled display more specific status labels:
| Label | Meaning |
|---|---|
| On-Demand | On-demand is enabled; the tunnel is waiting for a matching network. |
| Active (On-Demand) | On-demand is enabled and the tunnel is connected. |
| Activating (On-Demand) | On-demand is enabled and the tunnel is connecting. |
| Inactive (On-Demand) | On-demand is enabled but the current network does not match any rule. |
| Deactivating (On-Demand) | The tunnel is disconnecting. |
| On-Demand Disabled | The tunnel has on-demand rules but they are currently turned off. |
info
The "Inactive (On-Demand)" status is normal behavior. It means the tunnel will connect automatically when your device joins a network that matches the configured rules. See On-Demand Rules for details.
Connecting and Disconnecting
Tunnels in the "My Tunnels" section can be toggled on and off. In the detail view, a toggle control lets you connect or disconnect the tunnel. For on-demand tunnels, the toggle enables or disables the on-demand rules rather than directly connecting or disconnecting.
Managed tunnels do not have a user-facing toggle control. Their connection state is determined by the organization's MDM profile and on-demand rules.
Viewing Tunnel Details
Tap a tunnel row to open its detail view. The detail screen shows a summary header with the tunnel name, endpoint, and a status pill. The sections displayed depend on the tunnel source.
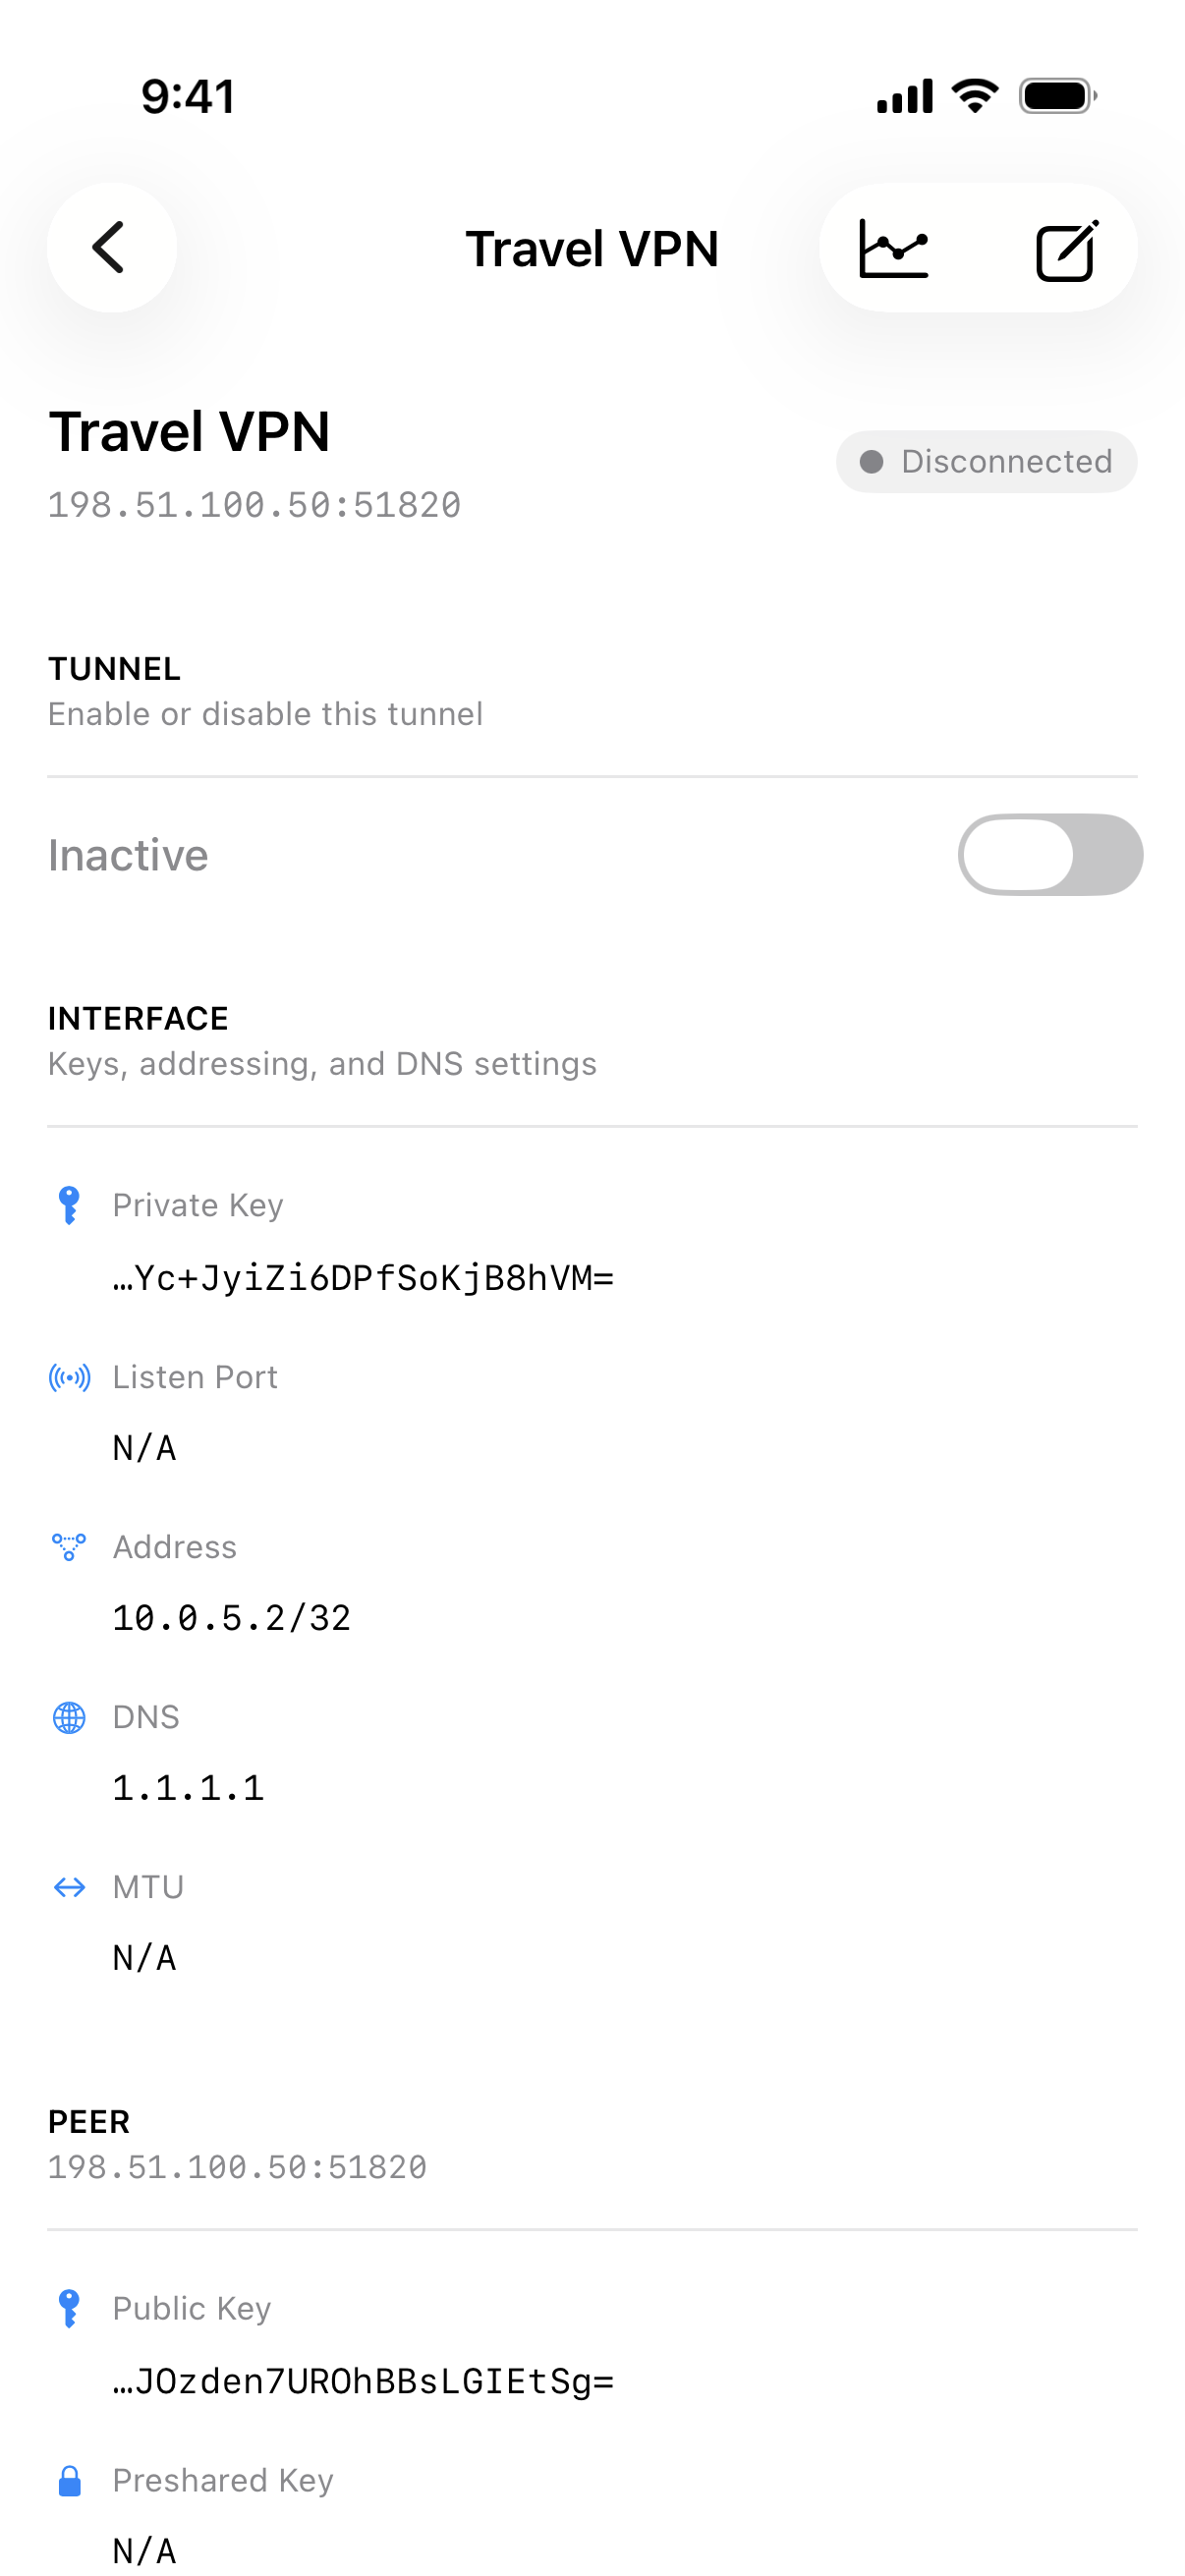
Sections Shown for All Tunnels
The following sections are shown for both app tunnels and managed tunnels:
Status. When a tunnel is connected and a handshake has been established, per-peer runtime statistics are displayed:
- Received — Total bytes received.
- Sent — Total bytes sent.
- Handshake — Relative timestamp of the most recent WireGuard handshake (e.g., "2 minutes ago").
For app tunnels, these statistics refresh automatically every second while the detail view is open. For managed tunnels, the statistics reflect the values from the most recent system snapshot.
Split DNS. Shows the configured match domains and search domains for the tunnel.
On-Demand Activation. Shows the configured cellular and Wi-Fi activation rules.
Sections Shown for App Tunnels Only
The following sections are only visible for tunnels in the "My Tunnels" section. Managed tunnels do not display these sections.
Tunnel. A toggle control for connecting or disconnecting the tunnel.
Interface. The WireGuard interface configuration:
- Private Key — The tunnel's private key (displayed truncated; tap to copy the full key).
- Listen Port — The UDP listen port, if configured.
- Address — The IP addresses assigned to the tunnel interface.
- DNS — The DNS servers used when the tunnel is active.
- MTU — The maximum transmission unit, if configured.
Peer. For each peer, the detail view shows:
- Public Key — The peer's public key (displayed truncated; tap to copy).
- Preshared Key — The preshared key, if configured (displayed truncated; tap to copy).
- Endpoint — The peer's address and port.
- Allowed IPs — The IP ranges routed through the peer.
- Persistent Keepalive — The keepalive interval (e.g., "Every 25 seconds"), if configured.
Delete Tunnel. A destructive button to delete the tunnel, with a confirmation prompt.
The toolbar also includes a bandwidth chart button (shown for both app and managed tunnels) and an edit button (shown only for app tunnels).
Editing Tunnels
Only tunnels in the "My Tunnels" section can be edited. Managed tunnels are read-only. To edit a tunnel, open its detail view and tap the edit button in the toolbar. The edit form lets you modify all WireGuard fields (interface settings and peer settings) as well as Vylos-specific settings including split DNS and on-demand activation rules.

warning
Tunnel names have a maximum length of 253 characters. Names that exceed this limit will be rejected by the form.
Deleting Tunnels
There are two ways to delete tunnels from the "My Tunnels" section:
- Swipe to delete — Swipe a tunnel row to the left and tap the Delete button.
- Bulk delete — Tap the selection button in the toolbar to enter selection mode. Select one or more tunnels, then tap "Delete Selected" at the bottom of the screen. Confirm the deletion when prompted.
danger
Deleting a tunnel removes it permanently. Managed tunnels cannot be deleted from within the app.
Pull to Refresh
Pull down on the tunnel list to synchronize the displayed state with the system VPN configuration. This is useful if a tunnel's status has changed outside the app.
Home Screen Quick Actions (iOS)
On iOS, Vylos registers up to four home screen quick actions based on your most recently used tunnels in the "My Tunnels" section. Long-press the Vylos app icon on the home screen to see these shortcuts. Tapping a shortcut toggles that tunnel on or off.